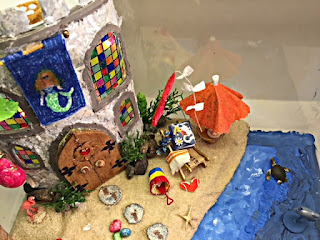
She said she wanted to make a miniature beach scene to share with her kids. From there on, we were buzzing with ideas! What if we made a castle
in the sand? One with lots of cool, fun, bright items that the children could
find? With that task in mind, we set to work.
This is the finished project.
1.
The container – I volunteered an old plastic terrarium.
The size is roughly 9” wide by 9” high by 13” long.
2.
The castle form–The castle was drawn on a piece
of poster board. The flat castle is 10” long and 8” high. Then Tricia cut out
the four windows, a big front door, and crenellations (those tooth-shaped bits
along the top). Then the piece was curled into an oval shape and the ends were stapled
together. Tricia used the final oval shape as a pattern to make a top floor for
the castle. She added a small indentation for the wiring of the lights. She cut
out two layers of trim to put around the windows, the door, and below the
crenellations. She painted the castle a light gray and the trim a darker gray.
I made the big door out of balsa wood. We decided to trim it with shells for
handles and a bit of doily painted gold. The final touches included a heart-shaped
“gem” and die-cut punch shapes to make the hinges.
3.
The stained glass windows—Tricia drew grids on
an overhead projector cell. Using Sharpie markers she colored in the blocks. I
love how bright and jewel-like they are! These were taped behind the open
windows. There is a battery operated light that shines through the windows and wow! It is soooo pretty!
 |
| Notice the sparkling exterior. See the red kite? The light is one, so you can see how the colored windows glow. |
Note: Click on the picture to see a larger version.
4.
The castle exterior—The exterior is covered with
crushed jingle shells. Tricia ground them down with a mortar and pestle. She
spread white glue on the castle and pressed the jingle pieces into the glue.
5.
Mermaid banner—I made this from a piece of white
cotton painted with fabric paints and hung from a toothpick and beads painted
gold.
6.
Pink snail—Tricia painted the snail shell a
cheerful hot pink nail polish. She added a coat of sparkle! I formed the snail’s
body from papier mâche and glued him to the side wall.
7.
Base (sand)—Several layers of waste Styrofoam
were shaped so that the castle would fit inside. The final shape was taped
together with masking tape and then painted sand color. Glue was spread over
the base before sand was added and pressed down so it would stick.
8.
Base (ocean) –This is acrylic paint put directly
on the base of the terrarium.
9.
Plants—These are plastic plants trimmed to an
appropriate size.
10.
Cactus—Tricia painted a piece of coral with
green nail polish.
11.
Rocks (around castle base)—These are from my
driveway! They get caught in the tread of my tennis shoes and I walk them into
the house. I figured, why not use them?
12.
Stepping
stones—Tricia cut these from a Styrofoam container. I painted them sand colored
and added the fake wet footprints.
13.
Palm tree—I made this from a cardboard strut
that’s part of a pants hanger. I used lapped pieces of a brown grocery bag to
create the bark. The fronds are green painters’ tape folded over floral wire
and cut to shape. The coconuts were formed from Crayola play clay and painted
brown.
14.
Sand castle (miniature)—I used more of the cardboard
strut. I cut it down to a 1” piece. The crenellations are small beads. The
tower is part of a wooden chopstick that I whittled down. I painted the tower
top red and the castle light tan. A black marker was used for the windows. The
wooden door is a piece of a wooden coffee stirrer.
15.
Green lizard (on coconut tree)—This is rather
crude, I admit. It’s an armature of green floral wire covered with green
painters’ tape.
16.
Colored sea shells—Tricia added these! So cute!
17.
Crab—Again, I formed an armature from floral
wire and coated it with paper mâche (paper towels and glue water).
18.
Starfish—These are five tips cut off of
toothpicks and glued together before being painted.
19.
Flip-flops—I painted poster board with orange
nail polish and cut it to the right shape. I glued on white floral wire for the
straps.
20.
Beach chair—This was a gift from my son.
21.
Beach towel—This is a thick paper towel striped
with an orange marker. The fringe is from a piece of white cotton fabric.
22.
ABC book—I made this from white copier paper,
blue scrapbook paper, and clear packing tape. The letters were punched out and
glued on, as was the flower.
23.
Lei—Tricia punched these flowers from tissue
paper and threaded them into a loop.
24.
Sand pail and shovel—This is another piece of poster
paper cut into a circular shape and a base. The handle is floral wire. The
shovel is the base of a tea light candle cut to shape and glued to another
piece of floral wire. And of course, then the whole shebang was painted.
25.
Flamingo—I bought this a long time ago.
26.
Seal—A bead I bought. Tricia painted it, glued
it to rocks and a small piece of plastic greenery.
27.
Whale—A bead that Tricia painted.
28.
Dolphin—A bead that Tricia painted. I stuck it
on a bit of toothpick and a base.
29.
Sea turtle—Tricia bought this at the Loggerhead
Marinelife Center.
30.
Umbrella and table—A gift from my son Michael.
31.
Glass of lemonade—A piece of clear soda straw
glued to a piece of plastic formed the glass. Yellow nail polish made the
lemonade—and the ice cubes are sea salt crystals. The straw is the plastic
covering from a paper clip. (You cut it and pull it off, leaving the metal
shape underneath.)
32.
Napkin—A piece of napkin bound by white floral
tape. A leftover flower from Tricia’s lei was added, along with a red bead.
33.
Bluebird—This is made of plaster poured into a
Mod Podge flexible mold and painted.
34.
Nest with eggs. (Same as the bluebird.)
35.
Background of Jupiter Lighthouse and pelican on
wharf. I painted them with watercolors and acrylics.
And I almost forgot--I added a red kite with a white tail.
I think the kids will have tons of fun looking for all the
items we’ve included in this project! What do you think? Do you have a favorite
item?


1 comment:
It looks awesome! Thanks for the extra touches you added.
Post a Comment