
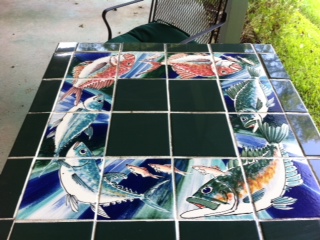
Hobbies keep our creative juices primed while we rest our writer brains. I tile wrought-iron table tops because the results last forever.
To try it, pick
a small table 2 or 3 feet square. Select tiles from Home Depot. Lowe's, tile
shops (they have other materials you'll need), bathroom accessory shops or
stores that carry artisan and imported tiles.
Tiles come in
various shapes and sizes. For now, select tiles the same size in either 2,3, 4 or
6-inch squares. They must be the same thickness and should fit within the dimensions
of your table top, allowing for 1/4-inch grout lines between tiles.
Supplies:
·
Grout, the adhesive between your table top and
tiles. If your table is for outside use, use sanded grout. Buy a 5-10 pound
sack or bucket of Polyblend grout, which has latex in it, in a basic color to
compliment your tiles: antique white, gray, or terra cotta. Dark-colored grouts
are messy and hard to clean.
·
Two empty plastic buckets, with double the
capacity of the amount of grout you purchased, for mixing dry grout with water.
·
Dust mask
·
Well-fitting rubber gloves
·
Garden trowel
·
Grout float
·
Flat metal spatula or several throw-a-way
plastic ones
·
Metal comb for spreading grout on table surface
·
WellBond tile adhesive
·
Clean sponges
·
Green plastic package wrap for your fingers
·
Grout sealer
·
A stiff 1/4-inch brush
·
Throw-away plastic drop cloth to put under work
area.
The project
can be messy. It's best to work outside and wear old clothes. Set up the work
space with your table in the center and tools nearby. Lay out your tiles on the
table top to make sure your design fits, leaving room for grout, then lay them
aside.
Note: To use your table outdoors, the
top must be made of wrought iron, cement, or Hardibacker cut to fit.
Hardibacker is 3/8-1/2-inch water-proof backer board found at home-improvement
stores. Not all stores will cut it to fit. Check beforehand. Don't use plywood:
even womanized plywood eventually warps under tiles, causing grout and tiles to
crack.
To mix grout,
put on your dust mask and pour 6 cups of dry grout into your empty bucket. Add 1
cup water. This mixture produces enough grout to tile a 20-inch round stone.
You can double/triple the amounts, but keep the same proportions of dry grout
to water.
Use the
garden trowel to stir the grout mixture as though you were mixing cookie
dough. The grout gets stiffer. Stir
hard. You're trying to get it to the consistency of stiff peanut butter. Grout
that is too wet will crack between tiles. Let the grout "set" for ten
minutes and stir it again.
Using your
metal comb, spread the table surface with grout mixture 1/4- 3/8 inch thick.
Spread horizontally, then vertically, making a criss-cross pattern. This gives
you a sticky surface in which to press your tiles. When you've spread about
half the table, "butter" the back of each tile with a thin layer of
grout and press it into the grouted surface of your table. Continue adding
grout to the surface, buttering tiles and positioning them until all are in
place with about 1/4-inch space between them. Some grout will ooze into the
spaces.
Use the grout
float or spatula to press more grout down between tiles. Press hard and force it
in. You can fool with the grout for an hour.
If a tile
comes up later, you can butter the back with WellBond, position it, then grout
around it with fresh grout.
When tiles
seem secure, and there's a level amount of grout between them, remove excess
grout with your fingers. Wind package tape around your fingers to help you remove
excess without getting your fingers sore.
Wait 30
minutes. You've done the hard part.
Using a very
wet sponge, rub grout off your tiles, avoiding grout lines. Your tiles shine
like diamonds rising from coal. Where grout gets stuck on the tiles, scrape it
off with the trowel. Brush left-over grout into the trash.
Take a deep
breath. You did it! Allow the grout to "cure" for 48 hours.
Keep an extra
water bucket nearby to soak and rinse your implements and gloves before grout
dries on them. Remember not to get water on grout lines.
Protect the
grout with sealer against dirt settling into it. After your 48-hour wait, brush
Aqua Mix Penetrating Grout Sealer into grout lines. Try not to get sealer on
the tiles: it makes them hazy. You can stick tape to either side of grout lines
to protect tiles while applying sealer. If you do get sealer on the tiles, you
can buy tile cleaner to remove it.
Store your
unused grout in a dry place. It lasts a long time.
Your beautifully-tiled
table will last forever!


When Nancy was writing her suspense novel,
NINE DAYS TO EVIL, supporting character Aggie Mundeen popped up and demanded that Nancy write a book about
her. Or maybe a series. FIT TO BE DEAD,
#1 (starring Aggie) was Lefty Award Finalist for Best Humorous Mystery. DANG
NEAR DEAD, #2 was named a “Must Read” by Southern Writers Magazine. In SMART,
BUT DEAD, #3, Aggie learns genetic secrets of staying young and critical
lessons about love and about staying alive.


4 comments:
Tracy, Thank you for hosting me on Killer Hobbies! I'm going to learn all sorts of things here.
Nancy G. West
Sorry for the late welcome, Nancy, but I had some Internet problems yesterday. In any event, thanks for the post--and the amazing creative information!
Thanks, Linda! I'm delighted to be a guest on Killer Hobbies. It lets me confess to crafty people about other things I do when I'm not writing Aggie Mundeen Mysteries.
I just read that you write four series? That's amazing!
I had to check this site out as I am following all the sites that are hosting Nancy. I love "Hobbies and Interests that drove you to murder" That had me laughing.
I keep creative with concrete. Not exactly the feminine hobby, but scrap booking was just NOT for me. I am now following your page to keep up with what you are doing on your down time.
Post a Comment