Showing posts with label crafting. Show all posts

Thursday, April 4, 2019

Cropping away...or will be soon.

Posting from a scrapbook retreat at Wisp Resort in McHenry, Maryland hosted by the awesome Christa Wildesen. The theme for this retreat is the Wizard of Oz, and I decorated my book table with a scene using vinyl and wine bottles. Decorating wine bottles seems to be a new hobby for me. I don't know what it is about using bottles as my canvas, but I like challenge it creates and trying to envision what new role the bottle can serve besides holding wine.


For the first time, I actually did pare down the amount of scrapbooking supplies I brought to the crop. I usually say I'll bring less as I only use about half of what I brought, but always end up with the exact same amount of stuff. This time I actually did and I have plenty of table space without feeling crowded. This weekend I plan to test the theory that with less stuff, I'll scrapbook more pages. (Once I get off the computer to scrapbook rather than catching up on messages and writing blog posts.)
Wish me luck!

Thursday, March 21, 2019

Scrapbooking: A Mix of Traditional Pages and Pocket Pages Part II

Last week, I talked about one of my methods for combining traditional and pocket pages: the "sandwich" method as I called it. This is when I start the multi-page layout with a traditional page, add in pocket pages, and then end with a traditional style scrapbook layout.
https://killerhobbies.blogspot.com/2019/03/scrapbooking-mix-of-traditional-pages.html

The other method I use s starting with a title page in a traditional layout out style with the pocket pages following it, having the last pocket page (usually a "back" page) end that particular event. I usually use the last page to include any extra pictures that didn't fit into any of the main themes of the pocket pages and/or to include memorabilia.

This layout, Playing Torrey Pines, as a total of 11 pages so I didn't include them all. A few of the pocket slots have a muted color card stock that I will add journaling or interesting facts about the golf course on. I haven't completed the journaling yet as I need my husband and son to let me know what to write.


Title page for the event. I plan to add some journaling
in the "white" space underneath the top photos.

The guys took pictures of each sign for the holes and then a couple shots while
they were golfing. I wanted to include all the pictures that were important
to them which is why this event has 11 pages.


The beige card will have a journaling on it. Still debating between
handwriting or using the Cricut to write the journaling.

The end page. One of the pictures will be removed to add in
a scorecard. And seeing the photo of the page, I think I'll trim down
the middle photo on the left side so I can mat it. I'd like the
Torrey Pine sign to stand out more, which will help give it
more of the end page look I prefer.


Thursday, March 14, 2019

Scrapbooking: A Mix of Traditional Pages and Pocket Pages

Sorry for having "disappeared" the last few weeks. Between trips, deadlines, and just feeling a little under the weather, I was having a hard time getting everything done, which is also why the post is late going up this week. But at least it's going up!

At a crop last weekend, I was getting a little overwhelmed with the amount of pictures I still had to scrapbook for our trip to California. We weren't sure when we'd be able to go back (loved California!) or that our children would be able to come with us. With them all being adults with jobs and schooling, we're never sure when they're schedules will allow them to join us so we do our best to enjoy and document the time. Which is why I end up with about 500 or so photos to scrapbook.

For some of the events, I had a ton of pictures and wanted to use them all, but I having a bit of trouble thinking of new ideas for traditional layouts. I usually do two page layouts, one page having the title and the other the journaling. Some of the places we visited needed more than two pages, so I started incorporating pocket pages into the layouts.

One of the methods I use to mix the pocket and traditional is to "sandwich" the two types of layouts.  I start with a traditional "beginning" and "ending" page and add in the pocket page (or pages) between the traditional pages.

The beginning and ending page to the traditional layouts I create. The journaling isn't complete as I prefer to journal at home rather than at retreats. Since I'm always a little distracted at retreats (talking, singing along to music), I usually have a mistake or two in the journaling block.

 Since this layout was of the Rose Garden and I had taken duplicate pictures of some flowers and cacti, I was able to pare down the photos. I only needed to include one pocket page which allowed me to have another eight photos. (Another layout I completed (which I'll share another week), I used more pocket pages as we had tons of photos to include.) I match the pictures in the pocket to the traditional page it'll be next to. Since the left page had the title (used the Rose Garden sign picture) and one of the rose bushes, I placed the rose pictures on the "front" side of the pocket page.


The end page of the traditional double page spread had cacti pictures so the "back" side used those photos. I really wanted to use the vertical picture so I trimmed it in half and matted it on card stock. It was the only place I could see to include it and have the layout flow together.


Thursday, January 31, 2019

Just Embellish

In crafting, sometimes mistakes happen. Some are small and others our big--almost tantrum inducing because of the cost of the ruined project. And I admit I almost had quite a toddler meltdown over this tote bag. I've added HTV (heat vinyl transfer) to totes numerous times before but for some reason...either the vinyl was defective or the tote...it just wouldn't stick.I tried for thirty minutes, and as it was time to start dinner, I had to admit defeat.

My plan was to try again the next day. Wouldn't you know it but the moment I started removing the vinyl (still attached to the carrier sheet) the "end" of the saying stuck. Now, I had lifted up all four corners and the design hadn't stuck which was why I was going to try later. I easily removed half the vinyl sheet, but the other part of the saying was finally stuck to the tote. I was not a happy crafter. I hated the fact that I had just ruined the bag as I don't have that many (and totes can be a little pricey).

What was I going to do? If it had been a scrapbook page, I'd just add an embellishment and be on my way. You know, add a sticker, a ribbon, a flower...something. Then I thought why not embellish the bag? I had a ton of fabric. If it didn't work out right, it didn't matter because the bag was already ruined.

I sewed a piece of fabric onto the back side of the bag and then added another piece of material (using no sew fabric tape) to make a pocket. I might try adding some vinyl to the pocket, which I'll try first by applying some to a piece of scrap material I have left over.

I chose a fabric that colors went well with the cover of  my new book because I was going to make a fabric transfer to place on the other side. I hadn't used a fabric transfer on canvas material before and figured might as well try it now. If it doesn't work, I won't be messing up another tote.  I did iron on the transfer before adding the pocket so the added bulk didn't interfere with the transfer sticking.

And it worked! It's not the tote I had planned to make, but I have to say that I really do like it. It turned out nice. Most of the time in crafting, all it takes is some well-placed embellishments to turn what you believe is a ruined project into a wonderful creation.

Thursday, January 24, 2019

Not A Creature Was Stirring is Out

This has been a fun and hectic week for me. Not A Creature Was Stirring released on Tuesday and the second book in the series was due to the publisher that day as well. I spent a lot of time jumping between finishing up on the edits to the manuscript and peeking (checking rankings and reviews) at how Stirring was doing.

Having a book due the same day as a release (note: I had asked for a later date due to my traveling in December) made me feel like I was ignoring one child for another. Both needed attention and I split my time the best I could. Though I have to say, needing to focus on book 2 didn't allow the brain-space for me to angst over the release of Stirring. Not to say I didn't fret at all but not as much as I usually do. But, I also couldn't just focus on that wonderful feeling when a book is born and is getting much love. I wanted to just celebrate but had work to do.

In case anyone is wondering why I'm not referring to book 2 by a title is because I'm now thinking I don't have the right one. I'm a bit of a over thinker and second guess myself a lot. I have sent off an email to my editor about it and will await for their take on the matter.


Not a Creature Was Stirring is available in ebook, hardback and paperback.

Amazon: https://amzn.to/2HsYB3W
Barnes and Noble: https://bit.ly/2Wdcp6f
Apple Books: https://apple.co/2sMPtgx
Kobo: https://bit.ly/2CSJ3Bh


Thursday, January 17, 2019

Card Hoarding

I love all different types of crafts especially those in the paper crafting arena and using electronic die cutters. There is an ebb and flow to how often and which of the crafts I focus on most: scrapbooking, vinyl creations, die cuts, or card making. Card making has taken a back seat for many years because of one issue I have--hoarding the cards.

I love making cards. I find the process relaxing and enjoy trying new techniques on cards that I'm rather hesitant to use on scrapbooking pages because I'm scared of ruining my photos. I haven't been making cards as much because I have such a hard time letting them go. They are made and then stored in a box waiting for--I really don't know.

I'm not sure if my hesitation is from enjoying my creation so much I don't want it gone or that I'm worried it will just end up in someone's trash. Not that I'd expect a person to keep a handmade card forever, I'd just like to know they'd hold onto it for a little bit.

Maybe next year, I should make one of my goals (along with crafting once a week and going to the theater once a month whether to see a movie or play) to send out one card a month. Here are some cards I've been hanging onto for about six months. I feel bad holding onto them but I'm reluctant to send them out. I can't believe how a simple thing has me so conflicted. What to do?

Thursday, December 27, 2018

Weekly Craft Project: Round Up Part III (End of Year)

I almost completed my goal of crafting (and documenting projects) for each week in 2018. While there was only one week where I didn't craft (our Disney week), I wasn't as good as remembering to document with a picture on Facebook. Once again, I shall make crafting at least once a week a goal in 2019 and will add to that taking a photo. I realized today that I didn't take one photo of a completed crocheted Elsa hat and I made four of them.

Here are some highlights of my crafting from September to December of 2018.

Originally, I had decided not to decorate my table for a Bewitched/witch themed crop,
but once I arrived I decided to get into the spirit of things and made some
canvas signs for my table. I'm not a Halloween decorator, so my daughters claimed
the signs for their home/office. (One took the black cat and the other daughter
claimed the other three)

I love Hallmark Christmas movies and wanted to make myself
a few shirts to celebrate my love. I also made one as a gift and
as a drawing prize for a crop.
A sign I made at a Christmas themed crop. Because of some logistic issues, there ended up not
being a table in front of me, so I made this sign to "explain" the issue. My oldest loved
the sign and took it to use for the gift drawing at work. (Her co-workers love
my signs and had wanted her Halloween/witch ones.)
Crocheting an Elsa hat while on vacation in Florida. This is the only picture
I have of an Elsa hat.
Paint and Sip class husband and I took while on vacation.

Thursday, October 18, 2018

Preparing for a Book Signing


It's been awhile since I've had a traditional book signing, or at least a signing where selling books is the only focus of the event I'm attending, and I have one coming up during Mountaineer week at WVU. I'm nervous and excited about it. Since a craft fair is also going on at the same time, and my mysteries have a crafting component, I decided I wanted to spruce up my table decor.

For a table cover, I usually use a piece of fabric that matches the theme of the newest book. Most of my crafting projects lately had been vinyling t-shirts and other items, so I decided to "upgrade" by decorating a fitted tablecloth with my book cover images, my name, and a slogan.


I bought some fabric transfer sheets (Avery brand) and printed my mystery covers on them using the ink jet printer. The colors were a little muted, but not sure if it's because of the program used to convert the image, the DPI resolution, or my printer ink is running out. (I have a feeling it might be the last as I've been doing a lot of color printing.)

Following the directions on the packaging, I pressed the image onto the fabric using the half-sheet recommendation. I lifted up a portion and noticed the image didn't completely transfer. I placed it back down but it had shifted and the image smudged. Fortunately, I only need one side of the tablecloth visible so I flipped it over and started again.

This time, I used the time for a full sheet transfer image...and added thirty more seconds to be sure. The image came out good...the top more clean than the bottom which had more details. I think part of the issue is the material the tablecloth was made from. My plan is to buy another one that has a higher cotton content and make a new one. I'm redoing my inspirational series and would like to add the covers onto the other side, in case I ever have both sides of the tablecloth visible.


And, as a follow-up to last week's blog entry, I wanted to share that I have put the first book of my inspirational romantic series up on Kindle. Lost Then Found is currently only available as an ebook on Amazon and is in the Kindle Unlimited program.


Thursday, September 20, 2018

Layering HTV- The Experiment

My husband and I joined a bowling league and part of the deal was if I started bowling, he'd wear a matching team t-shirt. I'm not sports-inclined but as it's a way for us to spend time with my daughter and her significant other, I conceded. I've been wanting to add layering HTV to my crafting repertoire, and found many reasons why the time wasn't right. I didn't have enough HTV colors. Didn't have the right project. I was in the middle of writing a book (which is pretty much always). I didn't want to waste the vinyl (once I bought it). Yep, one excuse after another. I even had a friend offer to come over and help me but I've been deep in the deadline cave and didn't have long to step out of it.

With the third week of bowling coming up, I knew I had to get our shirts done. It was the reason I agreed to join. So, I decided to give it a try because as my husband pointed out it was no more "wasteful" (my biggest fear--wasting supplies) to hold and not use the vinyl than it was to use it and mess it up. And at least by using it, I was giving myself the opportunity to get the hang of it. I'd never learn if I didn't try.

I went for it. I had a few missteps...mainly with the glitter vinyl...but was able to learn from it and the second try and the shirty came out much better. The big issue was with the glitter vinyl. Pieces of the glitter will stay on the transfer sheet, you just can't get it all off.

I found the easiest way to make sure random glitter doesn't get on your image is to trim down the transfer sheet, even if it leaves you with two small pieces to work with rather than one large image. The red was my glitter vinyl.

The other issue I had was in layering the main pieces. I didn't want to over press the main image, so I decided to add all the main back colors (orange, black, and yellow) at the same time. Well, that doesn't work so well when a piece of the transfer sheet ends up under the vinyl. The black semi-circles were attached to the transfer sheet of the yellow circle rather than the t-shirt. I had to peel off the black vinyl and start over, doing one color at a time. I was sure there was an easier and quicker way but decided to go with the longer method. I'm planning on making back-up t-shirts and giving it another try because as with most things practice makes perfect.

Thursday, August 16, 2018

Weekly Craft Project: Round Up Part Two

At the beginning of the year, I shared that one of my goals was to do something crafty once a week whether it's a whole project or part of a project. I thought it would be fun (and easy blog post to write, to be totally honest with everyone) to share some of the projects I have completed during this, roughly, four and half months of the year. During vacation this year and at the Stamp and Scrapbook Expo, I was able to try a few new to me crafts, which was something else I wanted to do this year. My next "craft bucket list" item is to make a card using a Create-a-Card die I got from HSN a couple of months ago.

In no particular order because the pictures weren't dated when I saved them:

2018 Craft Projects from April 20-August 16:


Added vinyl to a Project Life Binder Album. This was the first time
I decorated an album myself. I usually have them
embossed.

A t-shirt I made to wear at a Disney themed crop.

I hadn't made any die cuts in awhile, and had forgotten
 how much I enjoyed making them.

Cards from a Queen and Co kit. I still have all the cards.
Having a hard time mailing them. I might keep them.

My projects from classes and make and takes from the
Stamp and Scrapbook Expo in Chantilly, VA. One of my
favorite weekends of the year. First time I used vinyl
to create a sign.

During our vacation, I took some craft classes at the
Massanutten Resort in Virginia. The soap and jewelry
classes were new crafts for me.


Thursday, June 28, 2018

Stamp and Scrapbook Expo--Chantilly, VA


Last week, I attended the Stamp and Scrapbook Expo in Chantilly, Virginia. A friend and I were lamenting the fact that we hadn't had much time to spend together over the last few years, or at least not any one-on-one time. We've attended crops together but as it was with a group, we weren't really connecting with each other. We didn't want to drift apart so we started looking for a girl trip for this year, and we discovered the Stamp and Scrapbook Expo. It was perfect for us.

We spent one evening comparing our class lists and whittling them down to four (two a day) as we wanted to save some of our budget for buying supplies. Two of the classes were for making layouts, one for card making, and the other class was crafting with vinyl. Over the next few weeks, we took a look at the make and takes offered (basically mini classes where you make a project to take with you), early bird specials, and perused the coupons to plan out our day. We didn't want to miss a good deal.

We learned some new techniques and used some new to use products at our classes. The class kits contained extra products that we could use for other layouts/cards so were well worth the cost. I can't wait to find some crafting time and use the extra supplies. I especially love the directions available so on days I'm not feeling creative, I can make an easy pleasing layout and card...and it will give me some new design ideas.

The shopping was incredible. The area I live in lacks craft stores. Joann craft store is about thirty minutes away but their scrapbooking section has been shrinking at a rapid pace the last few years. There is a Michaels, Hobby Lobby, and AC Moore about an hour and half away but most of the time those three stores have pretty much the same items. I loved all the variety at the Expo. My favorite vendor, Paper Wizard, was there and I spent quite a bit of time (and money) and their booth. My family and I are going to Disney in December and Paper Wizard had a lot of detailed die cuts for the rides and other Disney themes. While I can cut die cuts out on my Explore or Cameo, sometimes to nice to have them premade where I only need to glue the pieces...especially when dealing with detailed images with small cuts. It can take a few tries to get the layers to cut correctly.

My friend and I had such a great time, we started planning our trip to the Stamp and Scrapbook Expo for next year before we even left. There are three changes we're already planning one (well, one change is just mine):

1. Leave my laptop home. I brought my computer along in case I had some down time and could get in a few hundred words or so on my WIP. The only reason I turned on my laptop was to charge up my portable charging unit for the iPhone. Next year, I'm going to bring a portable USB charger that  plugs into the wall and leave the laptop at home. This way there's no fretting if the laptop is getting to hot in the car if I make a stop at an outlet mall, or worry I'm going to leave the laptop.

2. No 8:30 am classes. Neither of us are early riser and need some time for the caffeine to kick in so classes after 10:30 would be better--and 10:30 is when most of the early bird shopping offers end.

3. Reserve hotel room early. We're both setting reminders on our phone to start checking for the group reservations to open so we can snag a room at the hotel near the Expo center. That might also help if we find an early class a must as we won't have to worry about getting through the Dulles airport traffic in the morning.


Thursday, June 14, 2018

Learning to Make SVGs

On my quest of "doing" this year, I wanted to learn how to make my own SVG (Scalable Vector Graphics) cutting files. I love using my die cutting machines (Silhouette Came and Cricut Explore Air), and since I switched offices about a year ago, I find I'm using them more. The set up for my new office and craft room allows me to have the cart with my machines right beside the computer desk, making it easy to hook them up. I don't have to rearrange chairs or carry a machine to the desk to use it.  

There have been some files that I wanted for a scrapbook layout and wasn't able to find them in either of the design places for the machines, and the ones I found on Etsy or from SVG shops weren't the style I wanted. It seems a lot of the designs lean more to "cutesy" and some pages I'd like something more formal for my pages. I had wished I knew how to make them and when I saw a class was created by a crafter/blogger I follow, I decided to give it a try. It's an online go at your own pace course. Just my style as if I'm not getting a lesson, I can go back and watch it again.

The first couple of classes I wasn't sure if I'd make it through, my brain just couldn't seem to comprehend what I needed to do, and it seems I'm not coordinated to use the pen tool. It took me hours to make one small, simple flower petal. I don't know if something is off my my hand coordination or if it's just something I have to practice doing to get a better hang of it (my husband believes it's the latter). There's just something not clicking in my head in how to curve the lines. I've re-watched multiple times and I can never get it to curve in the proper direction and the instructor makes it look so easy. I might check YouTube for some more tutorials on how using the pen tool in Inkscape. 

End of last week, the lesson was using the trace feature. This option I like. It still took me a while but I love the pop-up card that I made. I need a little more practice as there was an extra cut on the image I made, but it was easier for me to figure out than the pen tool. I can't wait to create a couple more files through the tracing method. 

Thursday, May 17, 2018

Cricut Easy Press

I've been wanting to make shirts for my family to wear to Disney World in December and have been putting it off because of how difficult/time consuming it was to use HTV (heat vinyl transfer) to add names to Santa bags. It took a few hours to adhere the HTV to the canvas bags. And to generate enough heat with the iron, I had to put a metal cookie sheet under the bag where the name was placed and use the floor as an ironing board wasn't firm enough. The bags came out nice, but it wasn't a fun crafting time. I was not looking forward to having to do this process for sixteen shirts times two for our trip.  (I had planned for two days of matching...now I might make more.)

For my birthday, my husband got me the Cricut Easy Press and this weekend I played with it. I like how easy it is to adjust the temperature for each project and loved the tip sheet it came with the temperature and amount of time for each project, though I found I needed a few seconds more for the projects. The auto shut off feature is another huge plus. No fear of accidentally leaving it on all night. Because of how large the heat plate is, I'm able to heat up a large portion of the t-shirt design at one time, allowing me to finish each project quicker. I also bought the Easy Press mat (it's a thin pillow-like mat that gives a smooth surface for using the press) to protect the surface I was using to press the iron-ons.

 I love the Easy Press! It has made ironing HTV so much easier. I even used the HTV on a cotton canvas to make a print for my daughter. I completed a few shirts on Saturday and then had intended to scrapbook on Sunday, but couldn't resist the Easy Press's pull and did a few HTV projects also. Now, I'm struggling to get my work done today as it's once again calling me to come play.

Here are a few of the projects I completed this weekend:


Thursday, April 19, 2018

Weekly Craft Project: Round Up Part One

At the beginning of the year, I shared that one of my goals for this year was to do something crafty once a week whether it's a whole project or part of a project (like the merboy tail). I thought it would be fun (and easy blog post to write, to be totally honest with everyone) to share some of the projects I have completed during this, roughly, four and half months of the year.

In no particular order because I forgot to date my pictures when I saved them:

2018 Craft Projects from January 1-April 19:


Merboy tail: This crochet project was one of my time consuming projects. I got a little off the pattern but it still turned out great and the recipient loved it. I had made one before and used brighter colors but the 4 year old receiving this one had asked for "boy" aka darker blues than the light blue and green color yarn I used for sister's mermaid tale.


Being a scrapbooker, I have completed some layouts over the last few months. I've made about thirty and will show off some of my favorites:


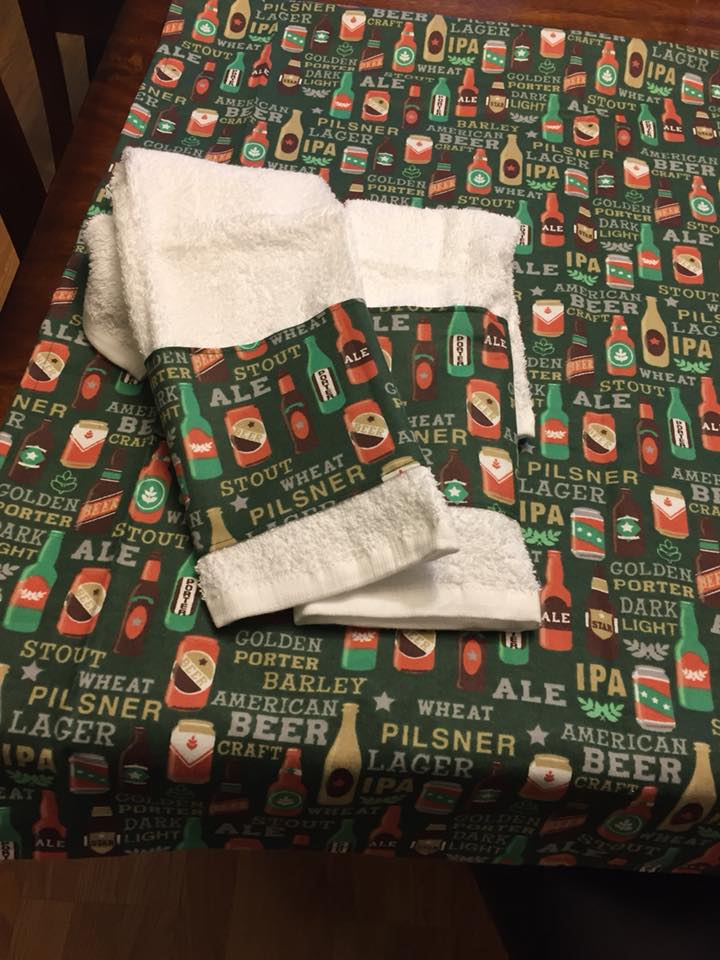
The last project I completed was on Sunday and it was a tablecloth and towels for the buffet that we use as a bar. Next on my list is to complete a craft project using items I bought...oh about a year or so ago...and if I don't by July then into the sell box they go. I told myself this was a for doing, and if I'm not going to use an item it's time to let it go.

Thursday, March 15, 2018

Getting Over the Crafting Fear

This year, I spend some time every week doing something craft related, and part of that is at least once a month, trying a technique or a craft that I've been scared of doing...last week was Print and Cut with the Cricut. I have a bad habit of buying/collecting items to do a project and then convincing myself it is above my capabilities or that I'd going to somehow ruin all of the materials. by trying to make the item. I keep telling myself it's no more of a waste to mess up the materials than it is to have them sitting in cabinets. It's one of the items I'm working on during my year of "doing" as I labeled 2018.

One of the reasons I got a newer Cricut, the Explore Air 2, was for more intricate die cuts and also using the writing and print feature. I love the writing feature, especially for journaling. My handwriting isn't the best and I like being able to include journaling that doesn't look typed and matching the pen color to the photos is a huge bonus. On  my to learn list this year was the Print and Cut feature. I've been delaying trying this feature, even after purchasing a color printer so I could use the function as I've been wanting to make stickers for my planner.

Last week I wasn't feeling well, and since I wanted to continue with my completing a craft project every week, decided to give Print and Cut a try. Just one, I told myself. One item. And, I'd make it easy on myself by using one of the Printables from Cricut Access. Pick a design, add it, click Make It. Not too hard.

And, it wasn't as hard as I had convinced myself for months it would be. YouTube videos helped a lot as I'm a visual learner. I'm planning on using this item in a cruise album when we went on a "pirate ship" to head to Honeymoon Cove and swim with the turtles (or rather my husband swam with the turtles while I lounged on the boat, I'm not a swimmer). I was so excited to give it a try and see that it wasn't as difficult as I was telling myself it was. Now, I'm trying to learn how to turn a regular cut image into a print and cut, I thought I had it figured out, by attaching the image together, but it cut out all the pieces. I'm thinking I might need to weld and attach. There's no way I want to print out quite a few Tinkerbells,and have all the individual pieces cut out and have to glue her all back together. Wish me luck!

Saturday, January 13, 2018

My First Project Revealed: My Needle Felt Llama

I'm not very good at following directions. I can write them, but I hate following them. Weird, eh?

However, since this was my first needle point experiment, I did (somewhat) follow the instructions in the pamphlet. They suggested that I divide the white portion of my roving, which is unspun yarn, into three piles. One third would be the llama's body. One third would be the head and neck. One third would be the legs.

After that, I was supposed to roll or shape the roving loosely into the appropriate body parts. However, I wanted my llama to have an armature, so he would be more sturdy and steady on his feet. Using a white wire coat hanger, I cut wire into lengths. One long portion was the tail, spine, neck and head. Two portions of the same length were the legs. These I joined with masking tape.


To make sure I didn't run out of yarn, I checked this armature against the dimensions of the finished product as listed on the package. It was correct, so I continued by wrapping my roving around the armature and then needle felting it.

So what is needle felting? Basically, you stab the roving over and over with a needle to pack down the fiber into a compact shape. Or in my case, you stab the roving, stab your fingers, stab the roving, and bleed on your project.

It's helpful to use a sponge beneath your project as a base, something to stab into, but only on those rare moments when you are not punching the needle into your flesh. And yes, I did a LOT of punching the needle into my flesh. I would get into a rhythm of punching, packing the fibers down, and I'd get distracted. (Tip: Do not attempt to watch your favorite series on Netflix while doing needle felting.) The sharp burst of pain from the needle implement would quickly snap my attention back to the here and now.

How did I do? Well, here's my finished product. I'll let you judge its merits. What do you think?


Thursday, January 4, 2018

Top 5 Crafting Moments

Happy New Year! It's 2018. 2018. For some reason that number really hits me and I'm not sure why. It seems like a year I couldn't imagine when I was a child and here it is. Stretched out before me. I'm trying to see the possibilities for all those days and reviewing what worked didn't work, and I wanted to try again from last year. In 2017, I decided to make crafting one of my goals. I realized I didn't spend much time on one of my favorite activities, so added crafting once a week onto my list.

In the beginning of the year, I was good at keeping track, and actually crafting every week, but faltered every now and then on that goal. I enjoyed making crafting a priority and am adding it back on my list. I've already received one request on something to make: a crocheted shark tail/or mermaid tail in blues/silvers/grays.

I tried some new crafts, finished some projects, and found an activity that my oldest and I could enjoy together. For this post, I'm going to share my Top 5 Crafting Moments.


Number 1. This project holds a special place in my heart as it's the first painting from a class I took with my eldest. We enjoyed the class so much, it is now our mother-daughter activity and we try to attend one paint session a month.

Number 2. Wine glasses decorated with vinyl for a Christmas gift for my daughter. She is a huge Harry Potter and I wanted to create something that tied in with her love for Harry Potter. I was a little nervous making them as I hadn't ever placed vinyl on a curved surface. She loved them!

Number 3. My second most time-consuming layout that I made in 2017. The pictures are from a trip we took in 2015. It took about 5 1/2 hours to complete the layout, a little more time than I usually spend on a double page spread, but I loved how it turned out. I wanted to create a layout that could double as a framed art piece if I decided to hang it on the wall.

Number 4. The most time consuming layout I made in 2017. This was kit from a class I took at the Killer Krops retreat in April. It took about 8 hours to piece together all the die cuts...some of the pieces were tiny. It would've taken me longer if I had to cut everything out myself but the amazingly talent instructor had cut out all the pieces. The cost of the class was worth it just not having to cut out all the die cuts myself.

Number 5. I was taking two of my favorite people in the whole wide world trick-or-treating at the mall and didn't have any trick-or-treat bags for them so I sewed up a couple. I made them reversal so the bags could be used later for other activities. I made the pattern myself and realized after sewing the first together that I forget to account in for the seam allowance so the bags weren't as wide as I wanted. It didn't matter as the children loved their bags, Spider-Man preferred his with the super heroes showing rather than the Disney Halloween fabric.